How to Use MUSE
One of MUSE's most powerful features is its ability to generate a complete, evidence-linked logic model from a plain-language description of your program. Instead of building each node by hand, you simply describe what your intervention does — and the AI handles the rest.
You can start from either a plain-language goal or an existing document such as a grant application (PDF or image). This guide walks through the goal-based flow first; the file-based flow is covered later on this page.
How It Works
When you click "Generate Logic Model," MUSE's AI:
- Reads your description and identifies the core intervention
- Constructs a full logic model with nodes at every stage (Activities through Impact)
- Searches the evidence database for research relevant to each causal connection
- Places everything on the canvas, complete with green evidence-backed arrows where research was found
The whole process takes about 1 minute.
Step-by-Step Instructions
Step 1: Open the Canvas
Go to musecanvas.app/canvas or click "Canvas" in the sidebar.
AI generation requires an account. If you're signed out, the dialog still opens, but the Generate button is replaced by "Sign in to generate", which lets you sign in with Google or GitHub and brings you back to the same page.
If you already have nodes on the canvas, the AI will add to what's there. If you want a clean slate, go to More → Clear All before generating.
Step 2: Click "Generate Logic Model"
In the toolbar at the top of the canvas, click the "Generate Logic Model" button (the one with the robot icon). A dialog box will appear.
Step 3: Describe Your Intervention
In the text box, type a description of your program or intervention. You have up to 1,000 characters to work with.
Your description should answer: What does your program do, for whom, and what change are you hoping to create?
Good examples to try:
"Impact of open source software contributions on the Ethereum ecosystem"
"Reducing food insecurity in urban communities through community gardens"
"Improving maternal health outcomes through mobile health interventions in low-income countries"
"Providing coding bootcamps to unemployed adults in rural areas to improve employment outcomes"
Step 4: (Optional) Enable External Paper Search
Below the text box, you may see a toggle labeled "Search external academic papers." When enabled, MUSE will also search Semantic Scholar for additional academic papers related to your logic model's causal connections.
This toggle is only shown on deployments where external paper search is enabled, so you may not see it on every environment. In a workspace with private mode turned on, external paper search is not run.
External papers are shown as reference material only — they are not scored by MUSE's AI. They supplement the curated evidence database with broader academic literature, including TLDR summaries and citation counts to help you quickly assess relevance.
Step 5: (Optional) Enable Metrics and Recipe Generation
You'll also see a toggle labeled "Generate metrics for each card," which attaches a metric name to every Output and Outcome card so you have something to measure. Below it, a second toggle labeled "Also generate recipe" runs the Measurement Recipe agent immediately after the logic model is built, producing a practitioner-ready measurement guide for every Output and Outcome metric in one streaming run.
This is the recommended path when you're generating a logic model from scratch — you get the outline and the operational measurement plan in a single session, in the same language you wrote the goal in.
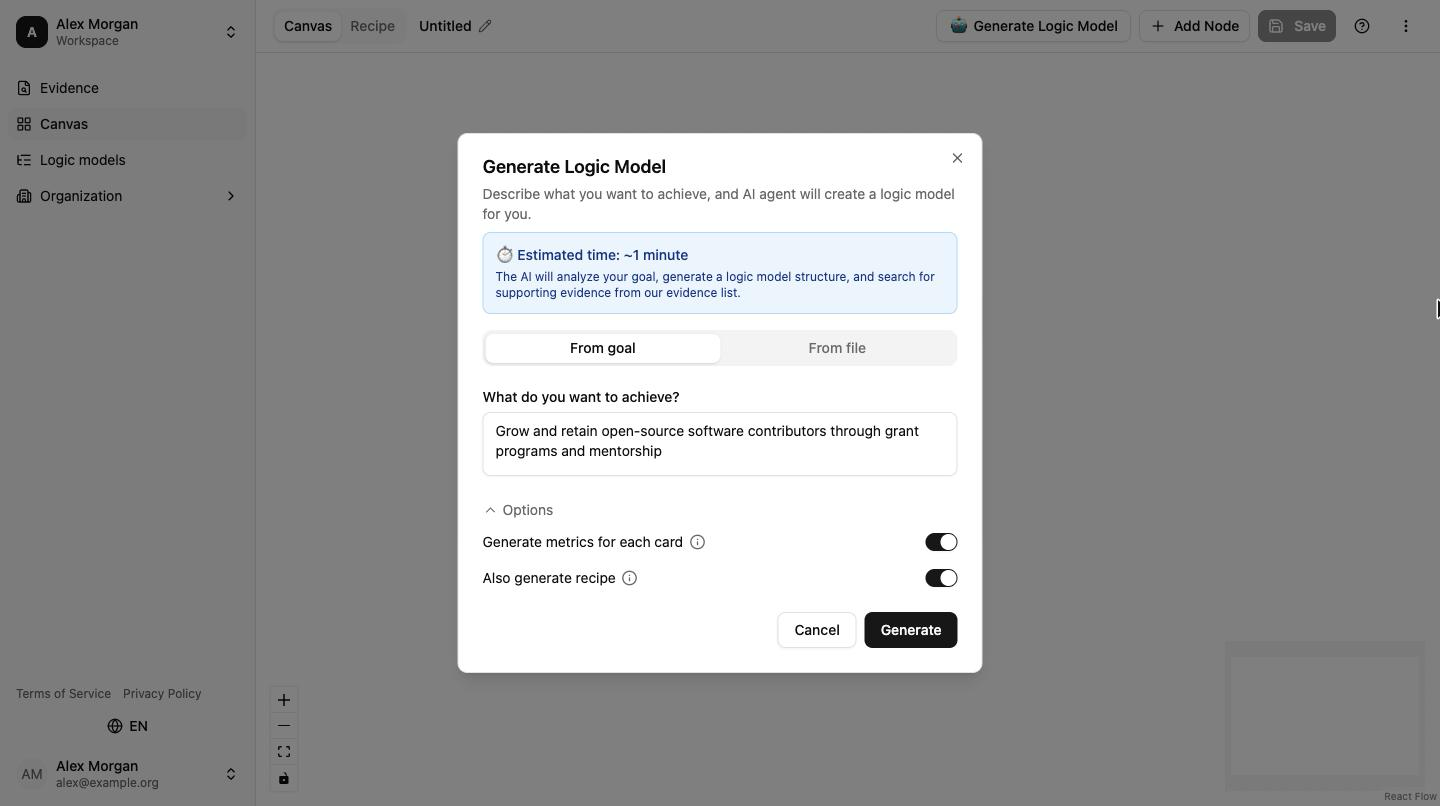
The Recipe toggle is only meaningful when the AI generates metrics for Output and Outcome cards. If you turn metric generation off, the Recipe toggle is disabled — there would be nothing for the Recipe to describe.
Step 6: Click "Generate"
Once you're happy with your description, click the "Generate" button. The dialog will show a live progress tracker.
Step 7: Watch the Progress
The AI works through the following steps, and you'll see each one tick off as it completes:
| Step | What's Happening |
|---|---|
| Generating logic model structure | The AI constructs the full set of nodes and causal connections |
| Searching for supporting evidence | The AI searches the evidence database for research relevant to your causal arrows |
| Searching external academic papers | (Only when the external-papers toggle is on) The AI searches Semantic Scholar for additional papers |
| Enriching canvas with evidence | The AI attaches the matched evidence to your causal arrows, turning the supported ones green |
| Completed! | Your logic model is ready |
Recipe generation is not one of the steps in this progress tracker. When the "Also generate recipe" toggle is on, the recipe runs as a separate workflow after the logic model is placed — a small dot appears on the Recipe tab while it streams in. See Measurement Recipe → for details.
Step 8: Review Your Logic Model
Once generation is complete, the dialog closes and your logic model appears on the canvas, arranged left-to-right by Auto Layout. You'll see:
- Color-coded nodes for each stage: Activities (blue), Outputs (green), Short-term Outcomes (yellow), Intermediate Outcomes (yellow), and Impact (purple). Short-term and Intermediate Outcomes share the same yellow, so tell them apart by the type label on each card
- Causal arrows connecting the stages in a left-to-right flow
- Green arrows where the AI found supporting research evidence
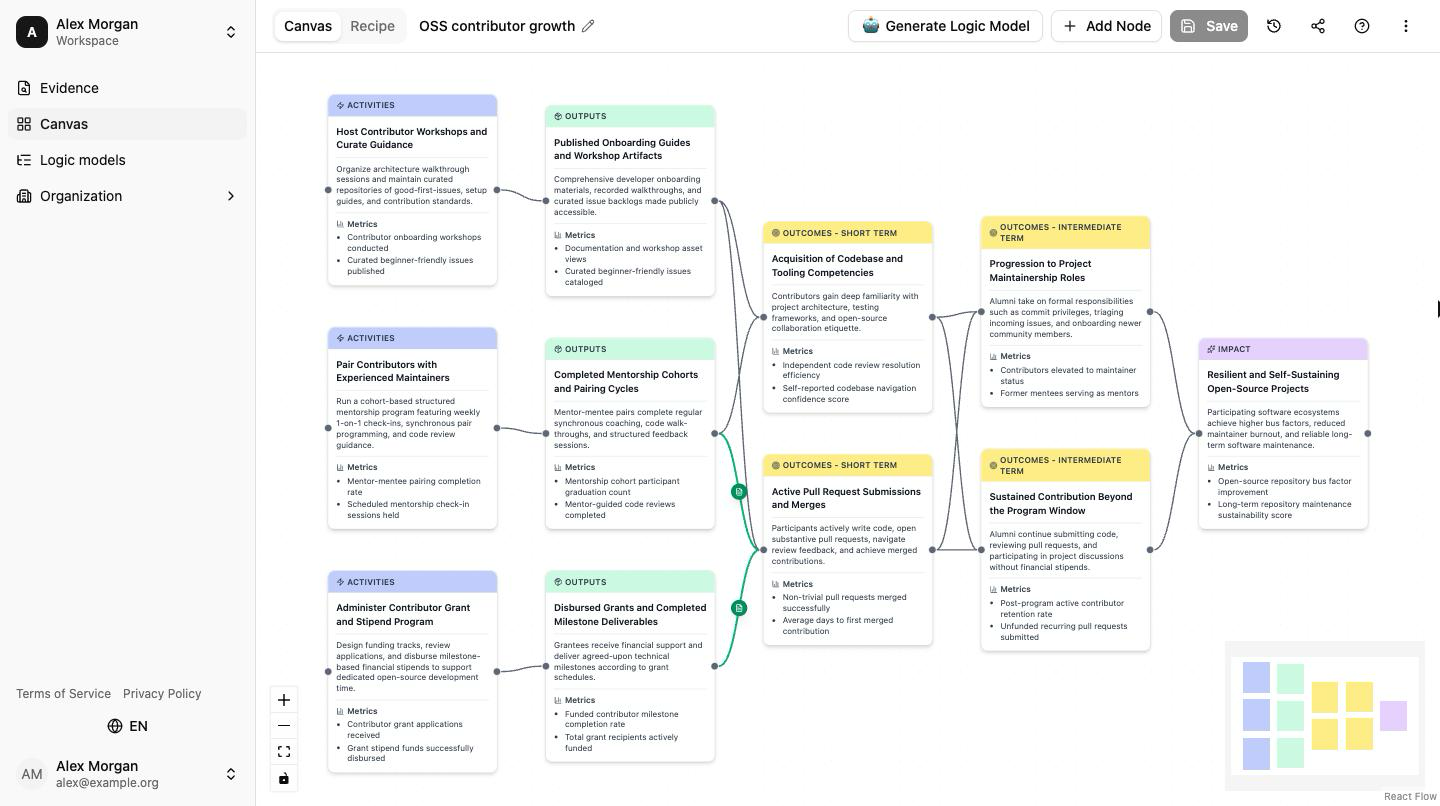
Green arrows are special — they indicate that a research study supports that causal link. You can click on a green arrow to see what evidence is attached.
The Auto Layout pass runs once, right after generation. If you drag nodes around later and want to reset the arrangement, open the More menu → Auto Layout to run it again.
If you enabled the Recipe toggle, switch to the Recipe tab at the top of the canvas view to browse the generated measurement guidance. See Measurement Recipe → for what's in it and how to download it as HTML.
Generating from a File (PDF or Image)
Instead of typing a goal, you can hand MUSE a document you already have — a grant application, a program proposal, a one-page concept note — and let the AI turn it into a logic model. This is useful when the thinking already lives in a file and you'd rather not re-summarize it by hand.
- Open the Generate Logic Model dialog as usual (Step 2 above).
- Switch from the From goal tab to the From file tab at the top of the dialog.
- Add your file by dragging it onto the drop zone, or click to browse and select one.
- MUSE accepts PDF, PNG, JPG, and WebP files, up to 4 MB each.
- The Options (external paper search, metrics, recipe) work exactly as they do for goal-based generation — set them the same way.
- Click Generate. The progress tracker is identical to Step 7 above — the AI reads the file, builds the logic model, and links evidence.
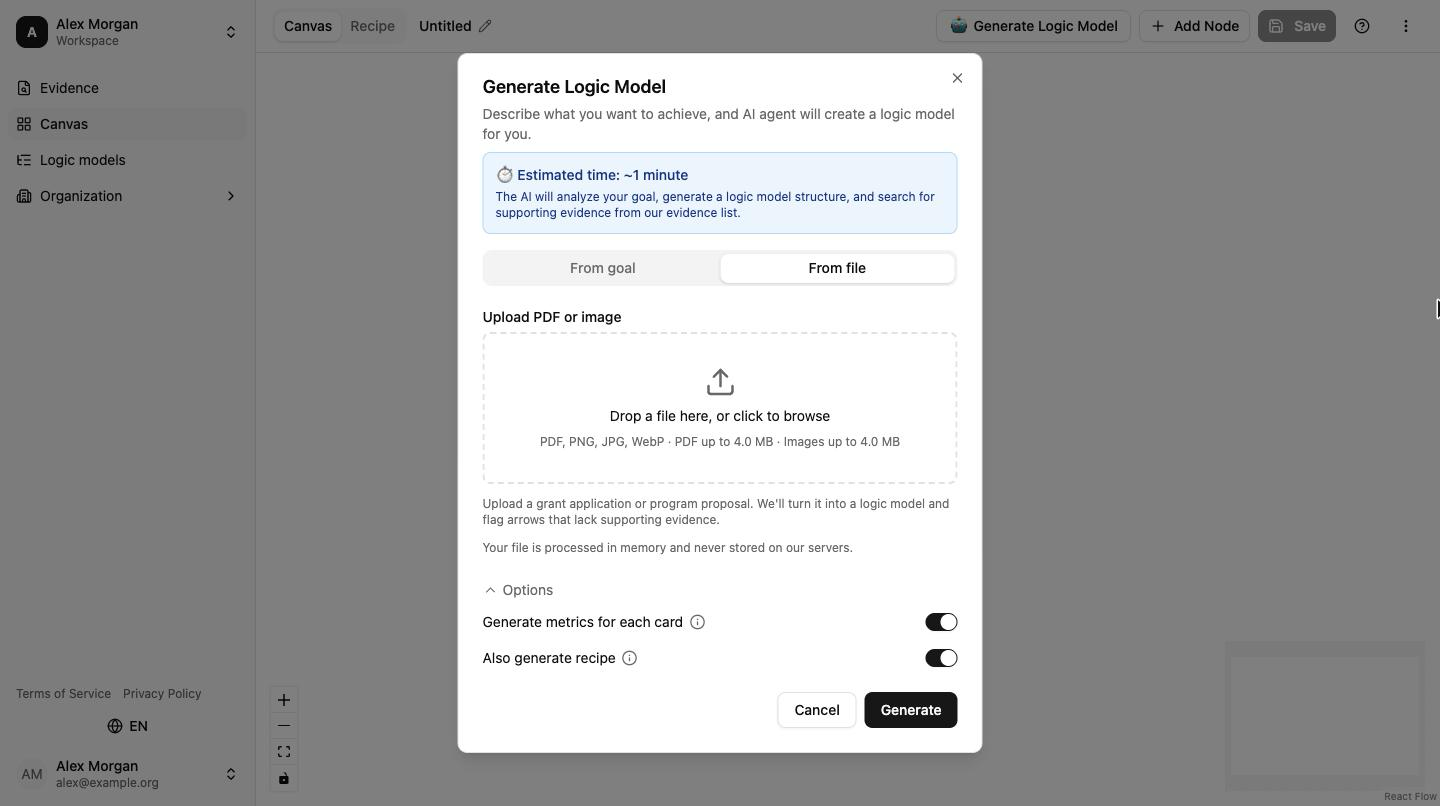
Your file is processed in memory and never stored on our servers. It's read once to generate the logic model and then discarded.
If the file can't be used, MUSE shows a toast: an unsupported format (anything other than PDF, PNG, JPG, or WebP) or a file over the 4 MB limit is rejected before generation starts. Pick a smaller file or convert it to a supported format and try again.
After Generation: Refining Your Model
The AI-generated logic model is a starting point, not a finished product. You are expected to review and refine it:
- Edit any node — Double-click a node or click the pencil icon to update its title and description
- Add metrics — Open any node's edit panel to attach measurable indicators
- Remove connections — Click an arrow and press Delete to remove it
- Add new connections — Drag from one node's handle to another to create a new causal arrow
- Add new nodes — Use the Add Node button to create additional nodes that the AI may have missed
- Rearrange the layout — Drag nodes to positions that make more visual sense for your model
AI-generated content reflects patterns in the evidence database and may not perfectly match your specific program context. Always review the generated nodes and evidence links with your own expertise before sharing or publishing.
What If Generation Fails?
If the generation encounters an issue, MUSE will display a specific error message:
| Error Type | What It Means | What To Do |
|---|---|---|
| High demand | The AI model is currently busy | Wait a moment and try again |
| Rate limit | Too many requests in a short time | Wait a minute before retrying |
| Timeout | The operation took too long | Try a simpler description, or try again later |
| Invalid input | Issue with the description | Modify your description and try again |
| Session expired | Your sign-in expired during the run | Sign in again and retry |
If the error persists:
- Close the dialog
- Check your internet connection